
Introduction to Backyard Botany
I owe my profound interest in gardening to the two DIY horticulturists in my life, my mother Lisa Oswald and the great Pamela Nester. When an orchid of mine is looking distressed, it goes to “rehab” at my mom’s. When I'm planning a new wildflower garden, Pam is there to walk me through the proper seed-sowing techniques. The nurturing I’ve received from these two expert gardeners has turned me into an amateur backyard botanist. I live for the gardening season, the blooming cycles, and the weekly harvests that happen right here in my own backyard.
For those without a garden guru, I wanted to provide a little introduction to the best of gardening in Berks County. This how-to guide is nowhere near exhaustive; it’s just my tips and tricks from the last five years of my gardening tutelage, things like:
How to plant seeds properly

How to thin the baby seedlings and make room for bigger plants

Which cut flowers are the hardiest in our climate?

When can I plant lettuce and tomatoes?
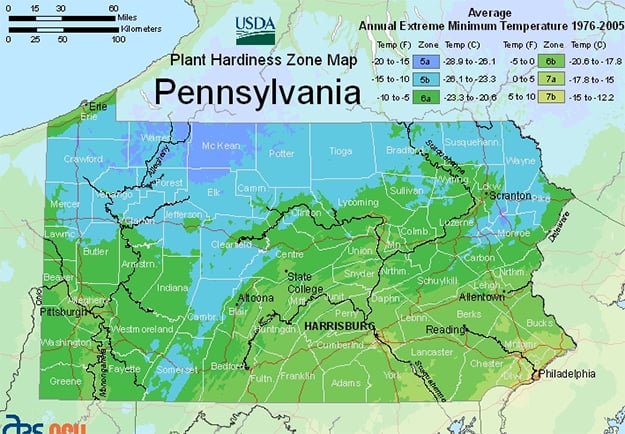
Know Your Zone
The first thing you need to know as a backyard gardener here in Berks is that we’re in plant hardiness zone 6. In zone 6, our frost-free date is May 15. This means that only cold-tolerant crops can be planted prior to May 15. It also means that certain flowers just won’t work in our zone. The first step to successful gardening is knowing your hardiness zone.
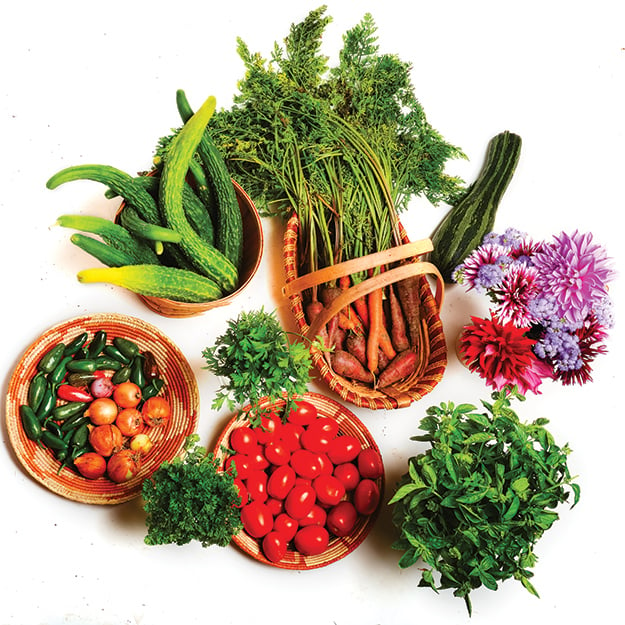
Vegetables
What to Plant When?
Crop and flower timing in Zone 6 goes a little something like this:
Cold-Tolerant Vegetables
plant outside in March/April:
Asparagus

Beets

Broccoli

Cabbage

Carrots

Garlic

Kale

Lettuce

Onion

Potatoes

Spinach

Radishes
Summer Vegetables
plant outside after May 15:
Basil

String beans

Cantaloupe

Cilantro

Chervil (a delightful, light herb similar to parsley)

Corn

Cucumbers

Eggplant

More lettuce!

Parsley (I prefer flat Italian parsley.)

Bell peppers

Jalapeño peppers

Rosemary

Strawberries

Thyme (I love French and lemon thyme.)

Tomatoes

Watermelon

Zucchini
Flowers
What to Plant When?
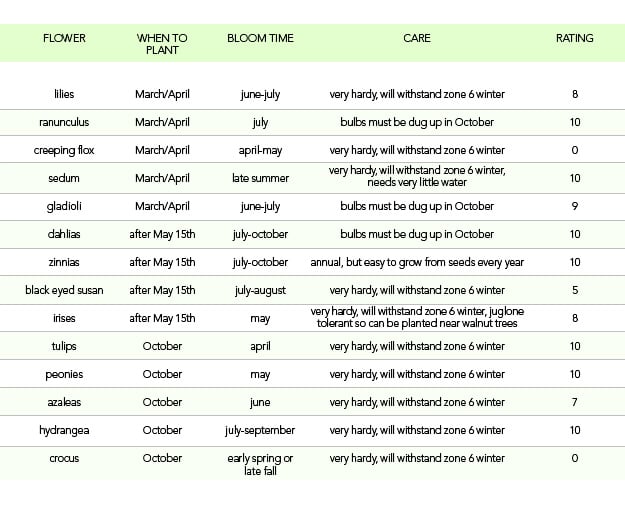
In terms of flowers, I am a perennial devotee. Perennials (not to be confused with annuals) are the types of flowers that, once planted, come up year after year. They bloom during the spring, summer, or autumn (depending on the variety) and then die back and go into hibernation until the following year, when they bloom again. Their bulbs/roots stay in the ground and are hardy enough to withstand our winters. I tend to prefer flowers that work well in bouquets, since I love seeing my blooms indoors.
Here are some of my favorite flowers and their ideal planting times.
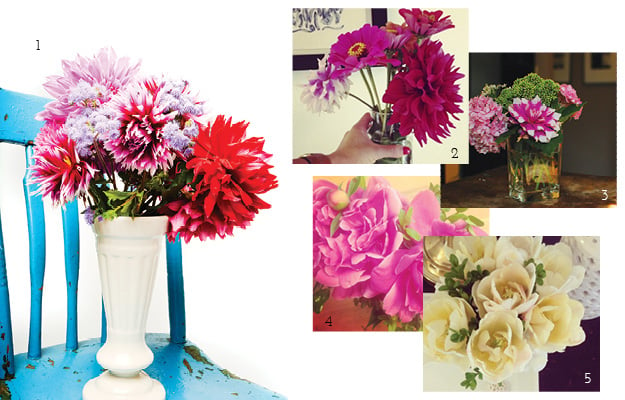
The bouquets below show off some of the beautiful blooms in my most favorite garden-sourced arrangements. Bouquet #1 is a mixture of dahlias and ageratum, and #2 is a few cut zinnias and one big dahlia, one of the easiest to throw together. Bouquet #3 is a mix of hydrangea, dahlias and sedum flowers. How gorgeous does the sturdy green sedum (actually a succulent plant) look amidst the pale pink hues? #4 is just two huge pink peonies with boxwood sprigs, and #5 is all white tulips, also accented with boxwood evergreen sprigs.
Soil
How to Prepare
For gardeners here in Berks County, the season really begins in March. Preparation for the season starts with your soil.
I keep my vegetables and delicate bulb flowers on a rotational schedule among four raised beds. Experts recommend that raised beds be built in 8-foot by 4-foot rectangles. You never want your raised bed to be wider than your arms can reach. A four foot width ensures that you can reach the middle of the bed from either side. You should always rotate your vegetables and flowers, if possible. This will ensure that the soil maintains even nutrients (and doesn’t get continually zapped from the same plant with the same nutrient needs, summer after summer).
Each spring I remove the top layer of straw from my beds and get rid of any pesky weeds that survived the winter. Then I fill each rectangle with two to three additional bags of organic gardening soil. You want to add back nutrients in March to give your plants a healthy boost before the growing season starts. To mix, use a shovel to bury some of the new soil in with the existing.
Planting
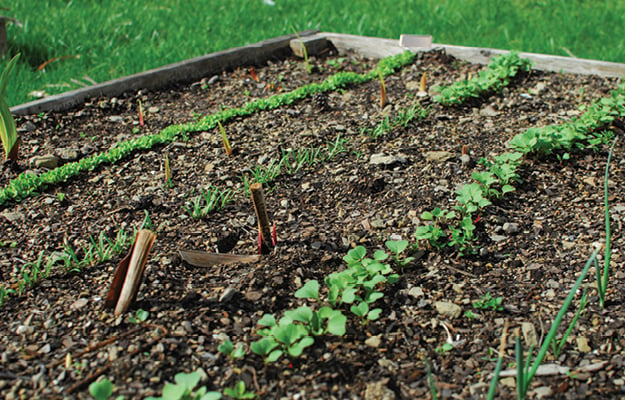
Now you’re ready to plant! First I use a piece of scrap wood to create rows for my seeds. Seeds generally need to be between 1/4”-1/2” below the surface of the soil, so check the back of your seed packet to estimate depth. I shimmy a piece of long thin wood into the soil to create the first row. Once the little row is indented, you’re ready to put your seeds in the ground. Pam taught me that the best way to plant seeds is with your bare hands. You don’t want to sprinkle the seeds directly from the packet into the ground, because this gives you less control over the seed placement. Once the seeds are in your cupped hand, sprinkle them evenly throughout the row, being careful not to get too many seeds “clumped” together in one spot.
Use your thumb and forefinger to then gently pinch together the soil, covering the seeds in your entire row. Then use the palm of your hand to pat the soil down firmly. Now you’re ready for watering.
Watering
Watering is always the first step after planting seeds or transplanting almost any plant. I use a hose with a sprinkler attachment so that the entire raised bed gets an even application of water. I generally run the sprinkler for at least 10-15 minutes to ensure a good soak. Throughout the season you should proceed to water about once a week, especially during the first few weeks while the seeds are germinating. In the hottest days of summer, you might need to water your vegetables and flowers twice per week. You can easily check by inserting a finger into the soil, if it feels bone dry, hook up that sprinkler! If the ground feels moist, steer clear of the hose. Over-watering can be just as bad for plants as under-watering.
Harvesting
A few weeks after the initial sowing of the seeds, tiny seedlings will emerge. It’s important that you thin these seedlings (pull out the small plants) to make room for bigger plants to grow. If you don’t thin the rows, you’ll never get bigger veggies to mature. This is especially true for beets and radishes.
After weeks of waiting, it’s time to harvest! For me, harvesting means enjoying whatever you’ve got. Whether that’s cutting tulips to make a bedside table bouquet or filling up a basket of fresh salsa ingredients. I find that I harvest vegetables in my garden when I need them and plan meals around the current crops. Salsa is one of my favorite go-tos in the summer. My girlfriend Christy introduced me to the simplest salsa recipe: just chop up tomatoes, onions, garlic, cilantro and jalapeños and throw them in a bowl together, then promptly devour with tortilla chips. There are so many amazing recipes to share. Happy gardening!
by Lily Oswald | photos by Mark Nester


